Route your entire home network through a VPN
You will need a device to use as a gateway for your network. A Raspberry Pi is good enough for this job. You will also need a valid account with a VPN provider such as ProtonVPN or NordVPN. ProtonVPN has the advantage of letting you connect to a few nodes, without bandwidth limit, if you subscribe to their free plan.
For this tutorial, I will assume you use a Raspberry Pi 4 with the Raspberry Pi OS (formerly known as Raspbian) and have an account with ProtonVPN.
Install your favorite OS and connect the device to your network, preferably using an ethernet cable.
Setup a fix IP address for your future gateway
First of all don’t forget to update your OS:
sudo apt update
sudo apt upgrade
note the current device IP address with the command
hostname -IThen, open a terminal on the Raspberry Pi and open the file called dhcpcd.conf
sudo vim /etc/dhcpcd.confadd the following lines to the file (replace XX with the actual address):
interface eth0
static ip_address=192.168.1.XX/24
# this is the IP address of your default gateway
static routers=192.168.2.1
static domain_name_servers=192.168.1.1 9.9.9.9
Then reboot the system for the changes to take effect
sudo rebootInstall OpenVPN
You will need OpenVPN to establish the VPN connection between your gateway and your VPN provider. Install it using the package distribution
sudo apt-get install openvpnthen activate the OpenVPN daemon
sudo systemctl enable openvpnSetup the OpenVPN ProtonVPN configuration
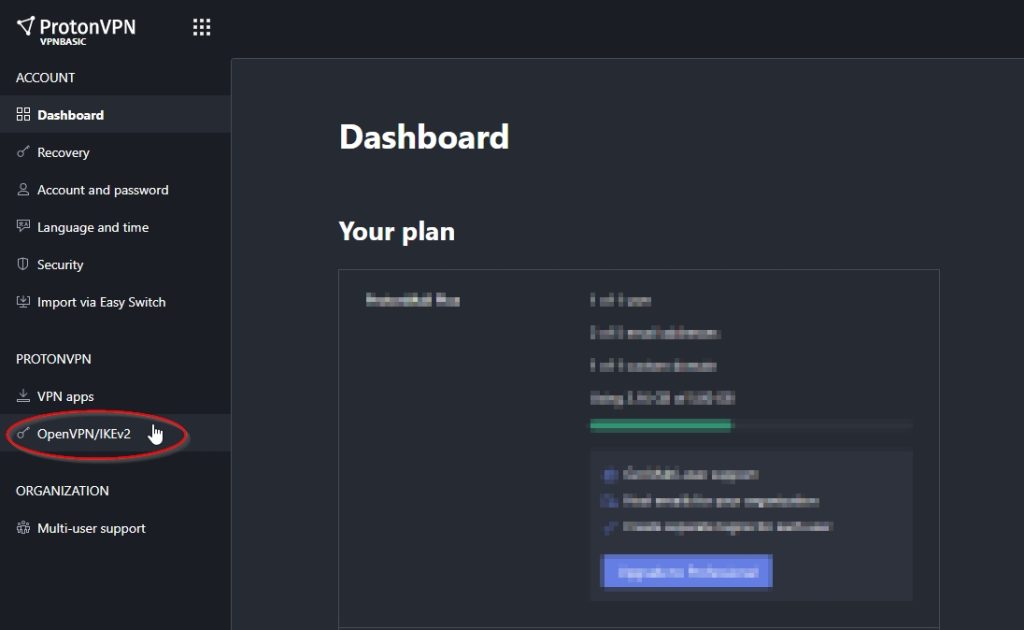
Go to ProtonVPN and login to access your personal dashboard. Then, on the side menu, click on the OpenVPN/IKEv2 item.

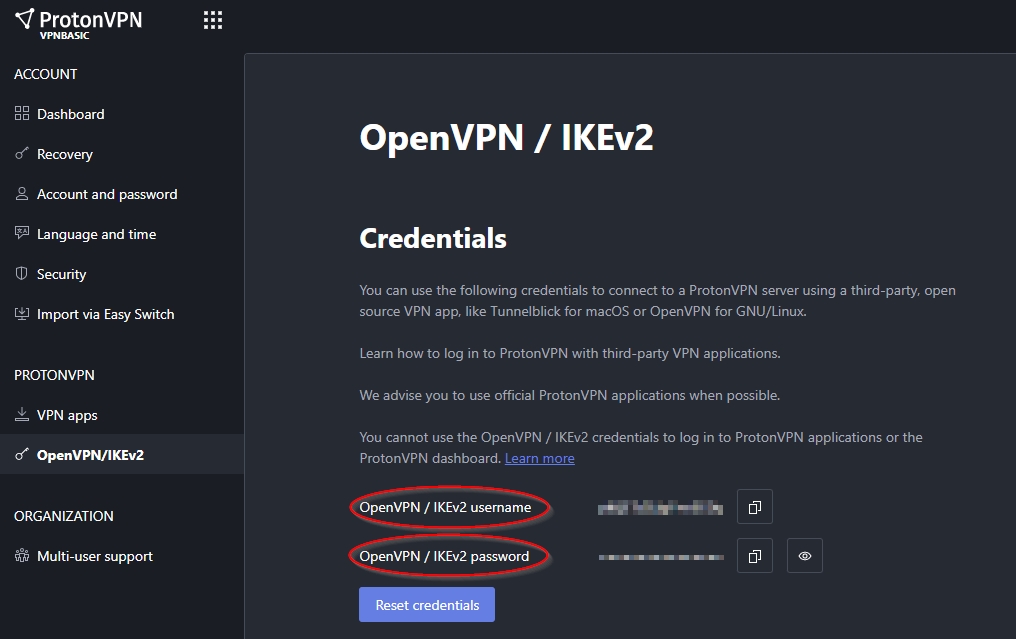
On this page, note the OpenVPN username and password (they are different from your regular ProtonVPN credentials) as you will need them later on in your configuration file.

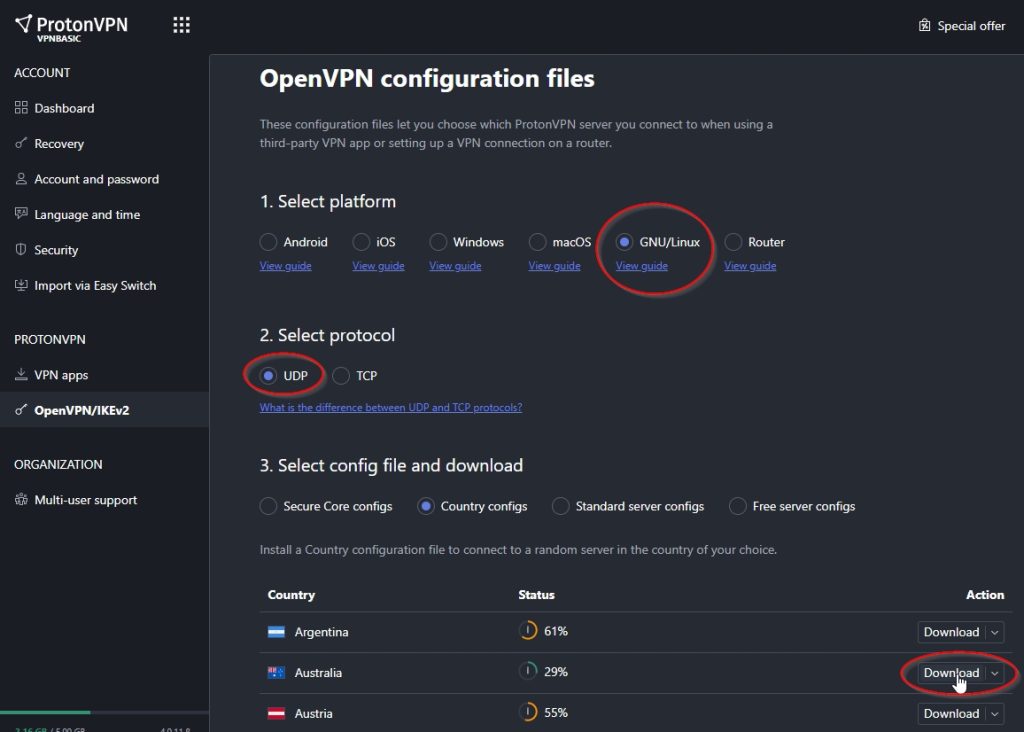
To generate a configuration file, choose GNU/Linux as your platform, UDP as the protocol, and then choose a country or a specific server in the list where you want to route your gateway traffic (and therefore your entire network). Then click on download to get the .ovpn configuration file. (Note that you can also choose a TOR node for even more privacy.)

Go back to your Raspberry Pi terminal and navigate to the OpenVPN configuration folder and create a new configuration file
cd /etc/openvpnCreate a new login file that will contain your ProtonVPN credential
vim login.txtand past on the 1st line your username and on the 2nd your password so it looks like
<your_ovpn_username>
<your_ovpn_password>
then, still in this same folder, create a server configuration file:
vim server.confcopy the content of the configuration file you just downloaded from Proton VPN and the line containing the auth-user-pass instruction to point to your login.txt file you just created:
auth-user-pass /etc/openvpn/login.txtAdd the following lines below to add additional routes and force the traffic through your pihole instance
# replace with the IP of your pihole instance
push "dhcp-option DNS 192.168.1.XX"
# replace with the IP of your gateway
push "route 192.168.1.0 255.255.255.0 192.168.1.XX 1"

script-security 2
up /etc/openvpn/update-resolv-conf
down /etc/openvpn/update-resolv-conf
Now start the OpenVPN client by establishing a new VPN connection
sudo systemctl restart openvpn@servercheck that your public IP address now matches a ProtonVPN exit IP for the country of your choice. For this, you can either navigate to https://dnsleaktest.com/ or issue the following command in the terminal
curl ifconfig.meSetting up the network routes and firewall
We need to let the Raspberry Pi forward the network traffic to act as a router:
sudo /bin/su -c "echo -e '\n#Enable IP Routing\nnet.ipv4.ip_forward = 1' > /etc/sysctl.conf"To verify that the changes have taken place, issue the following command:
sudo sysctl -pit should return
net.ipv4.ip_forward = 1Then we can start setting up the iptables firewall to channel all of the network traffic into the VPN tunnel. If necessary, install the iptables package:
sudo apt install iptablesSetting up iptables, especially for users less familiar with networking is not an easy task and wrong manipulations can easily break your entire network or deny access to some services or devices. So be careful when editing those rules. If you want to better understand what happens or tweak the iptables configuration further, I can recommend this post by DigitalOcean to get a better understanding of what is happening.
So let’s go back at our Raspberry Pi and add a NAT rule so that the traffic gets redirected to the correct devices:
sudo iptables -t nat -A POSTROUTING -o tun0 -j MASQUERADEThen we let the traffic go from eth0 to the VPN (tun0) interface and back
sudo iptables -A FORWARD -i eth0 -o tun0 -j ACCEPT
sudo iptables -A FORWARD -i tun0 -o eth0 -m state --state RELATED,ESTABLISHED -j ACCEPT
We allow the traffic on the loopback interface:
sudo iptables -A INPUT -i lo -j ACCEPTWe also need to allow traffic on specific ports for communication (ssh, ping, OpenVPN). Edit the following list as needed:
sudo iptables -A INPUT -i eth0 -p icmp -j ACCEPT
sudo iptables -A INPUT -i eth0 -p tcp --dport 22 -j ACCEPT
Allow return traffic for outgoing connections initiated by the Raspberry Pi:
sudo iptables -A INPUT -m state --state ESTABLISHED,RELATED -j ACCEPTNext, in preparation for the setup with PiHole, we need to enable a few more ports for the local network so that DHCP, DNS, any VPN connections and the PiHole web interface will also work:
sudo iptables -I INPUT -i eth0 -p udp --dport 67:68 --sport 67:68 -j ACCEPT
sudo iptables -A INPUT -i eth0 -p tcp --destination-port 53 -j ACCEPT
sudo iptables -A INPUT -i eth0 -p udp --destination-port 53 -j ACCEPT
sudo iptables -A INPUT -i eth0 -p udp --destination-port 1194 -j ACCEPT
sudo iptables -A INPUT -i eth0 -p tcp --destination-port 1194 -j ACCEPT
sudo iptables -A INPUT -i eth0 -p tcp --destination-port 80 -j ACCEPT
Then, we block all other network traffic that does not comply with any of the previously mentioned rules:
sudo iptables -P FORWARD DROP
sudo iptables -P INPUT DROP
When this is done, we can print the rules to get a global picture:
sudo iptables -t nat -L -v --line-numbers
sudo iptables -t mangle -L -v --line-numbers
sudo iptables -L -v --line-numbers
Changes to the iptables will not persist after a system reboot. In order to keep the Iptables after the reboot, we need to install a small utility and save the settings we just made:
sudo apt-get install iptables-persistent
sudo systemctl enable netfilter-persistent
sudo netfilter-persistent save
Edit your pihole configuration to set your default network gateway
(See this post for the details on installing pihole).
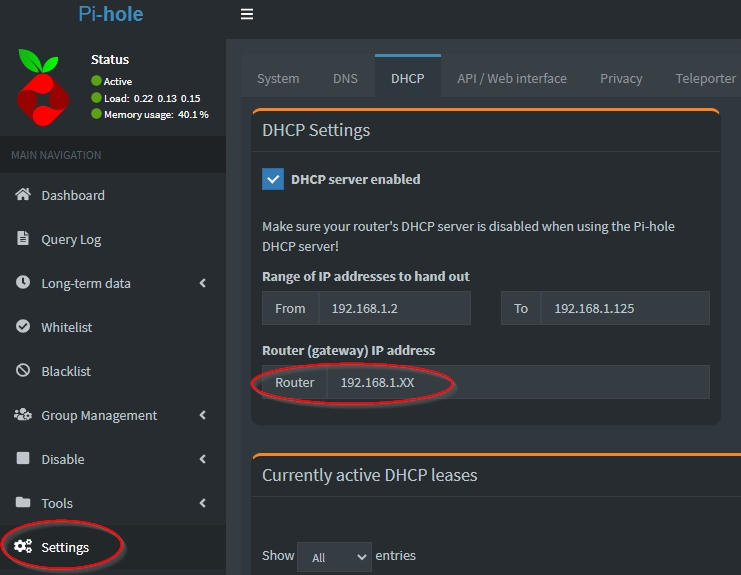
Go to pihole’s web interface and login to navigate to the settings menu. From there, you can define the gateway for all your connected devices.

Now try disconnecting a device from your home network (by disabling the wifi for example) and reconnect. Then navigate to https://dnsleaktest.com/ and check that your new public IP matches the ProtonVPN exit node.
Optional: Add rules to forward a second OpenVPN traffic
I you have deployed your own private OpenVPN server on a machine sitting in your home network (see this post), you will need to make some adjustments to redirect your home VPN traffic to the correct gateways.
First of all, you need to allow your OpenVPN traffic through the gateway by modifying the iptables rules:
# do port forwarding to the VPN 2 server and allow forward traffic
iptables -t nat -A PREROUTING -p tcp --dport 1194 -j DNAT --to-destination 192.168.1.45:1194
iptables -I FORWARD -i eth0 -o eth0 -p tcp --dport 1194 -j ACCEPT
iptables -I FORWARD -i eth0 -o eth0 -p tcp --sport 1194 -j ACCEPT
Then you need to mark all OpenVPN incoming traffic so that it can be redirected to your home VPN server (and not be redirected to your ProtonVPN tunnel):
# mark all packets that have to be routed through the 192.168.1.1 gateway
iptables -t mangle -A PREROUTING -p tcp --sport 1194 -j MARK --set-mark 1
Then we add a new route for your marked packets to let them go back through your default network gateway so that they can go back the way they came:
# define desired specific route for marked packets
echo 201 openvpn1194.out | tee --append /etc/iproute2/rt_tables
ip rule add fwmark 1 table openvpn1194.out
ip route add default via 192.168.1.1 dev eth0 table openvpn1194.out
Bonus: Survey your traffic using Monitorix

Install the monitorix package
sudo apt install monitorixThen edit the monitorix configuration file
vim /etc/monitorix/monitorix.confAdapt the configuration to your needs, in the net field, set your gateway to tun0 and enable the traffacct reporting and list the clients you wish to monitor with their ip-addresses. Note that this requires your devices to have fix ip addresses — you can set them up in the pihole interface.
# NET graph
# -----------------------------------------------------------------------------
<net>
        max = 10
        list = eth0, tun0
        <desc>
                eth0 = FastEthernet LAN, 0, 10000000
                tun0 = FastEthernet LAN, 0, 10000000
        </desc>
        gateway = tun0
</net>


# TRAFFACCT graph
# -----------------------------------------------------------------------------
<traffacct>
        enabled = y
        max = 20
        graphs_per_row = 2
        list = john-laptop, smart-tv, bob-ipad, alice-laptop, raspberrypi
        <desc>
                0 = 192.168.1.XX/32, 0@example.com
                1 = 192.168.1.XX/32, 1@example.com
                2 = 192.168.1.XX/32, 2@example.com
                3 = 192.168.1.XX/32, 3@example.com
                4 = 192.168.1.XX/32, 4@example.com


        </desc>
        <reports>
                enabled = n
                language = en
                default_mail = root@localhost
                url_prefix = http://localhost:8080
                smtp_hostname = localhost
                from_address = noreply@example.com
        </reports>
        rigid = 0
        limit = 100
</traffacct>
restart monitorix and check that monitorix is running and that no errors are present by issuing the command
sudo service monitorix restart
sudo service monitorix status
then navigate to the monitorix homepage below to have a live overview of your gateway status and a report of your devices network activity
http://<ip_or_gateway_hostname>:8080/monitorixAcknowledgments
This tutorial is heavily inspired by a Github page (in German) detailing the steps to create a NordVPN gateway integrated with pihole.
Edwardhob
In my opinion you are mistaken. I can prove it.
——
https://the.hosting/es/contacts
webmaster
In my opinion, you’re advertizing your own website.
But I probably cannot prove it.